In this article, I will give a brief introduction to using NVIDIA’s CUDA programming API to perform General Purpose Graphics Processing Unit Programming (or just GPGPU Programming). I will also show how to setup a project in Visual Studio that uses the CUDA runtime API to create a simple CUDA program.
History
Before we can understand where we are going, we must first understand where we came from. For that reason, I will give a brief history of GPU computing.
Moore’s law states that the number of transistors that can be placed on an integrated circuit will double every two years. This trend has proven to hold true over the last half century but these trends are predicted to slow in 2013 due to physical limitations in transistor size.
Chip designers have recognized that this 2-year doubling-rate cannot continue forever. In fact, it has been predicted that this trend will slow to doubling every 3 years beginning 2013 as stated in a report published in 2003 [Moore’s Law to roll on for another decade]. As an alternative to transistor miniaturization, microchip designers have turned to processor parallelization to increase processor performance.
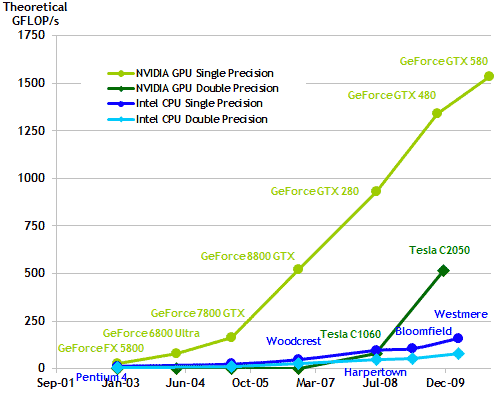
With the doubling of transistor counts on these integrated circuits, combined with the increase in CPU clock cycles, we see a doubling of processing power as well. Single-core processors in Desktop computers are capable of performing several hundred Giga Floating Point Operations per Second (GFLOPS/s) while Graphics Processing Units (GPU) are capable of performing several thousand GFLOPS/s as shown in the diagram below.
This trend towards processor parallelization greatly impacts the kind of software programmers need to write in order to take advantage of multi-core CPU’s and GPU’s. A program that runs in a single tread (single threaded, or sequential programs) will only benefit from a performance improvement when the single core of a multi-core processor is improved. In order to allow your program to scale well when more processors are added to the chip, we must take advantage of multi-threaded programming techniques.
Over the past ten years, we have have seen GPU’s go from the fixed-function rendering pipeline (using OpenGL, or Direct3D programming API’s) to programmable shader pipelines (using GLSL, or HLSL) and in the recent years we have seen the introduction of general purpose programming on the GPU. NVIDIA has introduced CUDA (Compute Unified Device Architecture) as the General Purpose computing API for their graphics card hardware.
In this article, I will show how you can use CUDA in your own applications to take advantage of these massively parallel processors also known as the GPU.
Getting Started with CUDA
Before we can write programs that take advantage of the processor parallelization found in modern GPU’s, we must first prepare our development environment by installing a few tools from NVIDIA.
System Requirements
In order to develop CUDA enabled applications on your system, you will need to meet the following requirements:
- CUDA-enabled GPU (GeForce 8 Series or better)
- Microsoft Windows Operating System (XP, Vista, or 7)
- Microsoft Visual Studio (2005, 2008, or 2010)
- NVidia development device driver
- CUDA Software Toolkit
If you are not sure you have a CUDA-enabled GPU, you can check list of CUDA-enabled GPU’s on the NVIDIA CUDA website at http://developer.nvidia.com/cuda-gpus.
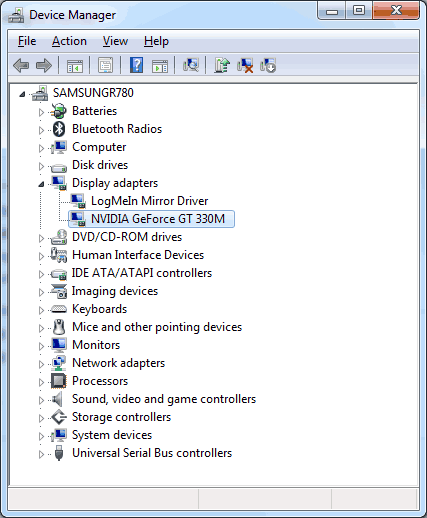
If you are unsure which graphics adapter you have in your system you can check it in the Device Manager in Windows. Open the Device Manager (Open the System Properties applet either from the Control Panel or by right-clicking the My Computer icon on your desktop and select Properties from the pop-up menu that appears and select the Device Manager option).
In the Device Manager, expand the Display Adapters node. If you have an entry in the Display Adapters with one of the GPU’s listed on the CUDA Enabled GPU’s list, then you can use and develop CUDA enabled applications.
Getting CUDA
If you meet the system requirements, then you can install the CUDA Toolkit that is needed to develop CUDA applications.
At the moment of writing this article, the latest CUDA Toolkit is version 4.0. You can download the CUDA Toolkit from the NVIDIA CUDA download page: http://developer.nvidia.com/cuda-toolkit-40.
On the CUDA Toolkit 4.0 download page, you will find links for the CUDA Developer device driver, the CUDA Toolkit 4.0, and the GPU Computing SDK. If you plan on using Visual Studio 2010 to develop your CUDA enabled applications, then you will also want to download the CUDA Toolkit 4.0 Build Customization BUG FIX Update.
Installing the Development Drivers
The first step is to make sure you have the development drivers specific to the CUDA Toolkit you plan on using. As of this writing, the developer drivers for desktop development are at version 270.81 and for notebook development, you need the 275.33 developer driver.
The download links for the developer drivers can be found on the CUDA Toolkit 4.0 download page located here: http://developer.nvidia.com/cuda-toolkit-40.
Installing the CUDA Toolkit
The CUDA Toolkit contains the tools needed to compile and build a CUDA enabled application in conjunction with Microsoft Visual Studio. It includes the custom build configurations, headers, libraries, CUDA program compiler, and other resources.
Download the CUDA Toolkit for your platform (32-bit or 64-bit) from the CUDA Toolkit 4.0 download page located here: http://developer.nvidia.com/cuda-toolkit-40.
Run the downloaded executable and following the instructions in the installation wizard. The CUDA Toolkit 4.0 installation path defaults to “C:\Program Files\NVIDIA GPU Computing Toolkit\CUDA\v4.0”. This directory will contain the following subfolders:
- bin\ – The CUDA compiler executables and runtime libraries.
- include\ – Header files needed to compile CUDA programs.
- lib\ – Library files needed to link CUDA programs.
- doc\ – CUDA documentation such as the CUDA programming guide, Best practices guide, and reference manual.
If you plan to develop your CUDA enabled applications in Microsoft Visual Studio 2010, you will also need to download the CUDA Toolkit 4.0 Build Customization BUG FIX Update available on the CUDA Toolkit download page located here: http://developer.nvidia.com/cuda-toolkit-40. Follow the instructions in the README file located in the zip archive.
At this point, you are ready to start developing CUDA enabled applications. As an optional step, you can also download and install the GPU Computing SDK which contains code samples, white papers, and tools that demonstrate how to use CUDA in your own applications.
Installing the GPU Computing SDK
Not necessarily essential to developing CUDA enabled applications, but is a very good learning resource is the GPU Computing SDK. A download link to the GPU Computing SDK is available on the CUDA Toolkit 4.0 download page located here: http://developer.nvidia.com/cuda-toolkit-40.
The default install path for the GPU Computing SDK on Windows XP is “C:\Documents and Settings\All Users\Application Data\NVIDIA Corporation\NVIDIA GPU Computing SDK 4.0\” and on Windows Vista and later, you will find it in “C:\ProgramData\NVIDIA Corporation\NVIDIA GPU Computing SDK 4.0”.
The GPU Computing SDK comes with the GPU Computing SDK Browser which can be used to run all of the samples included in the GPU Computing SDK installation package. The GPU Computing SDK also includes the source code for all the samples, but before you can compile the samples, you must ensure you have the developer driver and CUDA Toolkit installed as described in the previous sections.
The GPU Computing SDK is installed with the following subdirectories:
- C – Solutions and project files for Microsoft Visual Studio 2005, 2008, and 2010 including source code that demonstrate CUDA.
- DirectCompute – DirectX DirectCompute source code samples.
- OpenCL – OpenCL source code samples.
Verify the Installation
To verify the installation, I encourage the reader to try to compile and run the source code samples directly from Microsoft Visual Studio. In order to verify the installation, you should make sure you have the GPU Computing SDK installed as described in the previous section.
I will use the environment variable %NVSDKCOMPUTE_ROOT% to refer to the root folder where the GPU Computing SDK has been installed (dependent on operating system).
Open the Microsoft Visual Studio solution file for the CUDA samples located in the “%NVSDKCOMPUTE_ROOT%\C\src” directory.
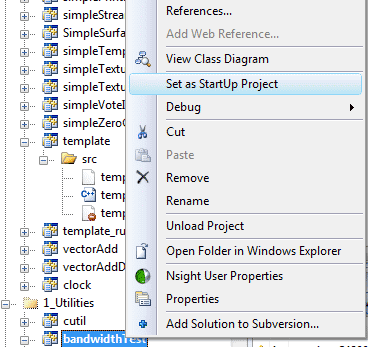
The projects are separated into different solution folders depending on the type of project it is. Expand the “1_Utilities” solution folder and right-click the “bandwidthTest” project and select “Set as StartUp Project” from the pop-up menu that appears.
Try to run the bandwidthTest project by selecting “Debug -> Start Debugging” from the file menu, or click the “Start Debugging” button ![]() on the toolbar.
on the toolbar.
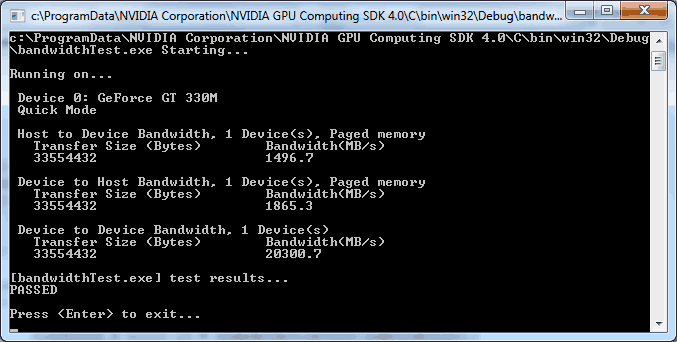
If everything is working correctly, you should be presented with a console window similar to what is shown below:
The output on each system may vary but the most important indication that you have everything working correctly is the presence of the “test result… PASSED” at the end of the output.
In my case, I couldn’t compile one of the DirectX 11 texture samples because of missing libraries for DirectX 11. I simply excluded the simpleD3D11Texture project from the build using the Build Configuration Managerand the offending error will go away.Clicking “Yes” on this dialog if it appears will allow you to continue to debug the project unless the project you are running was the offending project.
If the bandwidthTest fails to build, or doesn’t run then you may want to check that you have installed the correct developer drivers and correct CUDA Toolkit according to the previous sections before continuing.
Creating a CUDA Project
Now that we have the dependencies for developing CUDA enabled applications, let’s see how we can create a new project in Microsoft Visual Studio. For this article, I will use Microsoft Visual Studio 2008 because it is still the most common development environment in use at the time of this writing. The steps required for Microsoft Visual Studio 2010 are very similar and probably do not require any further explanation.
Let’s open the Microsoft Visual Studio IDE and create a new project. Let’s call the new project “CUDATemplate”.
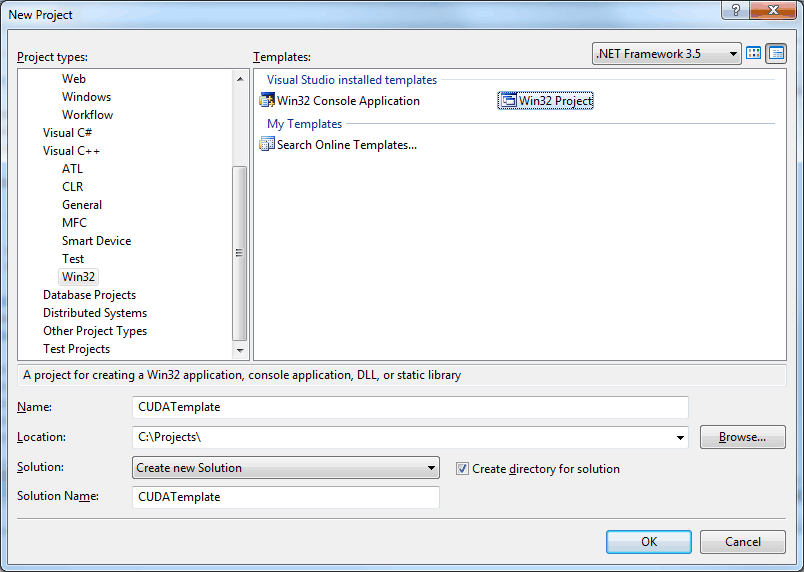
- Select “File -> New -> Project…” from the file menu. You should be presented with the New Project dialog box shown below.
- In the “Project types:” frame, select “Visual C++\Win32” and select the “Win32 Project” template as shown in the image above.
- Enter a name for your project such as CUDATemplate and a location where the project file will be saved.
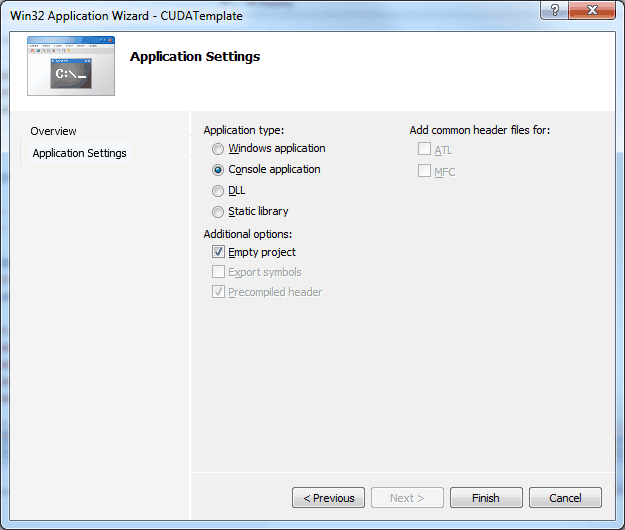
- Click the “OK” button to accept the project settings. The “Win32 Application Wizard” dialog box should appear as shown below.
- In the “Win32 Application Wizard” dialog box that appears, select the “Application Settings” on the left, or simply click “Next” at the bottom of the dialog box to proceed to the “Application Settings” page.
- In the “Application type:” group, select the “Console application” radio button and click the “Empty project” check-box under “Additional options:”.
- Click the “Finish” button to create the new project in Microsoft Visual Studio.
You should get an empty project with the name CUDATemplate in the solution explorer.
Before we add any source files to the project, we should tell Visual Studio that this project will contain CUDA code and we want our CUDA source files to be compiled using the NVIDIA CUDA compiler utility instead of the default Visual C++ compiler. In order to do that, we are going to add a custom build rule to the project’s set of known build rules.
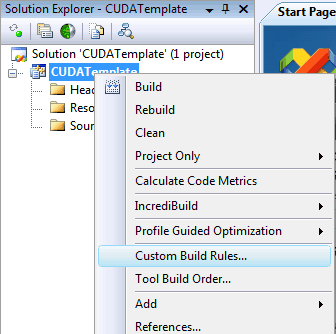
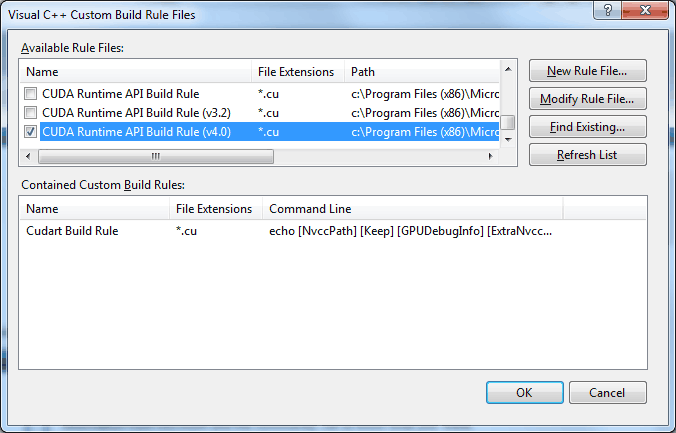
- Right-click on the CUDATemplate project in the Solution Explorer and select “Custom Build Rules…” from the pop-up menu that appears.
The “Visual C++ Custom Build Rule Files” dialog box should appear as shown below.
- Scroll through the list of available build rules and select the “CUDA Runtime API Build Rule” for the toolkit version you are targeting. In my case, I have several toolkits installed, but I’m targeting the 4.0 toolkit, so I’ll select the “CUDA Runtime API Build Rule (v4.0)” custom build rule.
- Click the “OK” button to close the dialog box.
Now let’s add a source code file that will be compiled by the NVIDIA CUDA compiler.
- Right-click the CUDATemplate project and select “Add -> New Item…” from the popup menu that appears.
- In the “Add New Item” dialog box that appears, choose “Visual C++\Code” under the “Categories:” section and select the “C++ File (.cpp)” file template under the “Templates:” section.
- Specify a name for the new item including the extension “.cu”. In my case, I choose “template.cu”.
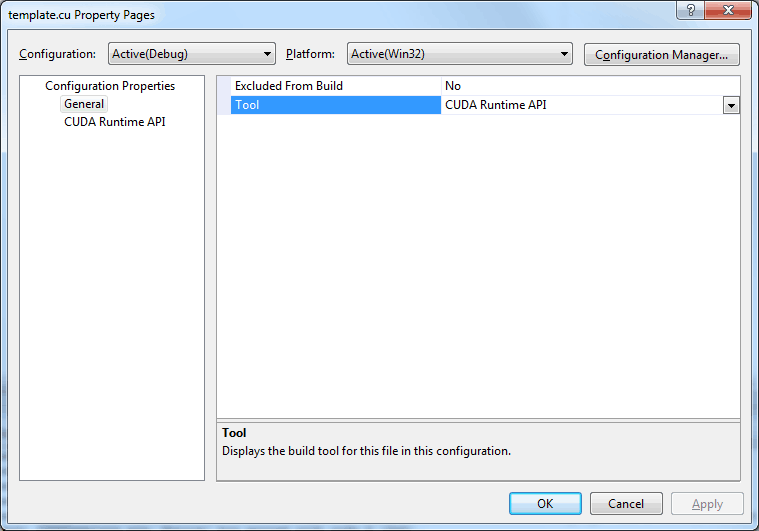
You should observe that if you specify an item with the “.cu” file extension, then the “CUDA Runtime API” will be automatically assigned as the custom build tool for that item. You can verify this by checking the item’s properties dialog box. Right-click the “template.cu” item in the solution explorer and select “Properties” from the popup menu that appears.
If you select the “Configuration Properties\General” item in the “Property Pages” dialog box, you will notice the “Tool” option is set to “CUDA Runtime API” as shown in the image below.
If this is not the case, then you probably need apply the Custom Build Rule to the CUDATemplate project as discussed earlier. Once you’ve verified the “CUDA Runtime API Build Rule” is associated with the project, you may need to modify the “Tool” option on the newly created item to use the “CUDA Runtime API” build tool.
Now let’s fill in some source code to our template CUDA source file.
- Open the “template.cu” file in the source code editor by double-clicking the file in the solution file and add the following code to the file.
|
1 2 3 4 5 |
int main( int argc, char** argv ) { return 0; } |
I haven’t added any actual CUDA code yet. I first want to verify that the CUDA compiler is able to compile this source file using the CUDA Runtime API build tool.
If you try to compile this file now, you may receive the following linker errors:
|
1 2 3 4 |
1>Linking... 1>template.cu.obj : error LNK2019: unresolved external symbol ___cudaUnregisterFatBinary@4 referenced in function "void __cdecl __cudaUnregisterBinaryUtil(void)" (?__cudaUnregisterBinaryUtil@@YAXXZ) 1>template.cu.obj : error LNK2019: unresolved external symbol ___cudaRegisterFatBinary@4 referenced in function "void __cdecl __sti____cudaRegisterAll_54_tmpxft_00001148_00000000_8_template_compute_10_cpp1_ii_main(void)" (?__sti____cudaRegisterAll_54_tmpxft_00001148_00000000_8_template_compute_10_cpp1_ii_main@@YAXXZ) 1>C:\Projects\CUDATemplate\Debug\CUDATemplate.exe : fatal error LNK1120: 2 unresolved externals |
It is useful to note that the NVIDIA CUDA Runtime API build tool is only responsible for compiling the CUDA source files into object code. The task of linking the object code into an executable file is still the job of the linker that is part of Visual Studio. Before our CUDA program will link, we need to tell the linker to add the CUDA Runtime API library to the library dependencies.
- Right-click the CUDATemplate project in the Solution Explorer and select “Properties” from the popup menu that appears.
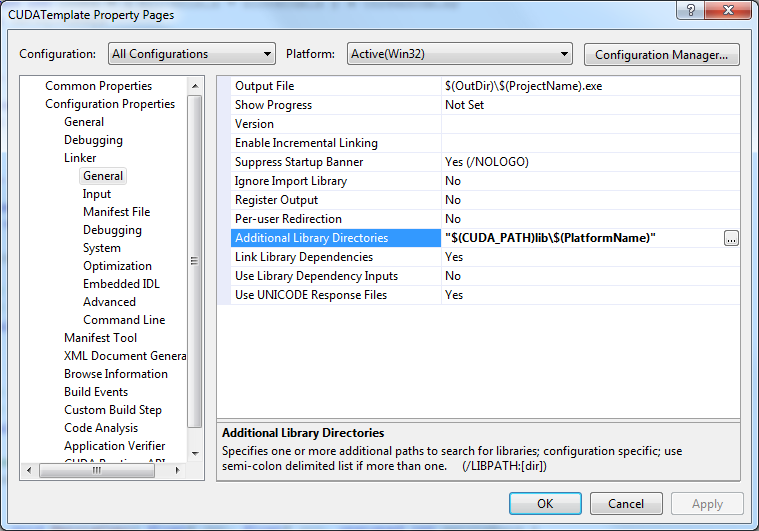
- Navigate to the “Configuration Properties\Linker\General” option.
- In the “Additional Library Directories” field, add “$(CUDA_PATH)lib\$(PlatformName)”. The CUDA_PATH is an environment variable that is automatically added to the system environment variables when you install the CUDA Toolkit. This variable resolves to the base directory where CUDA Toolkit was installed. The $(PlatformName) resolves to Win32 if you are compiling a 32-bit application, or x64 if you are compiling a 64-bit application.
Now we still need to tell the linker to link against the CUDA runtime library.
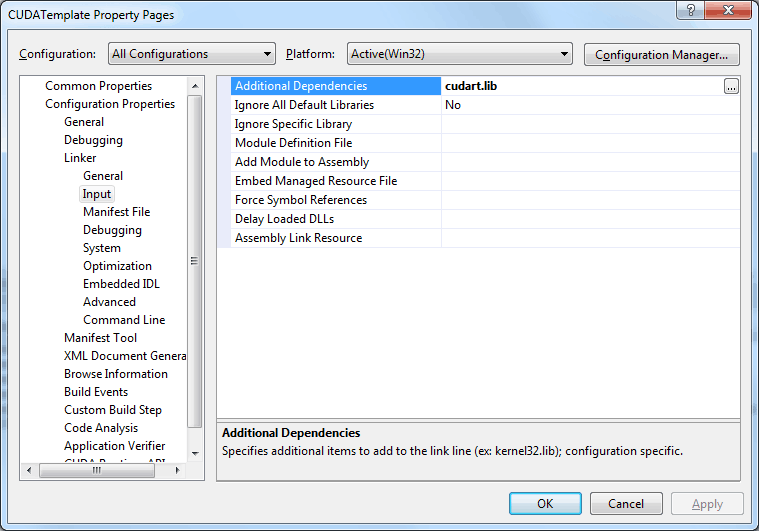
- Select the “Configuration Properties\Linker\Input” option in the CUDATemplate Project Property Page.
- In the “Additional Dependencies” field, add the “cudart.lib” as shown in the image below.
- Click the “OK” button to close the Project Properties dialog box.
Linking against this library will cause our program to implicitly load the CUDA runtime DLL that implements the CUDA functionality.
Now let’s try to compile the project again. This time you should not receive any compiler or linker error. You should also be able to debug the project (although it does nothing) to verify that the program loads and shuts-down without any problems. If this is the case, then we are ready to start adding some CUDA code.
The CUDA Kernel
The Kernel is defined as the function that is invoked for every thread that is executed on the GPU to solve a certain problem.
Let’s first define a CUDA kernel that will be used to copy memory from one buffer to another. At this point you should not be overly concerned with the source code shown here. I simply want to establish a minimum example that uses CUDA to do something. In a later article, I will go into more detail about the CUDA thread execution model, and the CUDA memory model.
Add the following code to the “template.cu” source code:
|
1 2 3 4 5 6 7 8 9 10 11 |
__global__ void MatrixCopy( float* dst, float* src, unsigned int matrixRank ) { unsigned int x = ( blockDim.x * blockIdx.x ) + threadIdx.x; unsigned int y = ( blockDim.y * blockIdx.y ) + threadIdx.y; unsigned int index = ( matrixRank * y ) + x; if ( index < matrixRank * matrixRank ) // prevent reading/writing array out-of-bounds. { dst[index] = src[index]; } } |
This function is called a CUDA Kernel. The __global__ attribute indicates to the CUDA compiler that this is a function that should be executed on the GPU (device), but it is invoked from the CPU (host).
A CUDA Kernel defines a single thread that is executed on the GPU. The blockDim, blockIdx, threadDim, and threadIdx variables are 3-component struct variables that define the number of blocks in the grid (blockDim), the number of threads in a block (threadDim), the ID of the block within the grid (blockIdx) and the ID of the thread within the block (threadIdx).
Don’t worry too much about these values yet, they will be explained in more detail in the article on the CUDA thread execution models. The only thing you need to know is that we can use these variables to determine which element of the array the current thread should operate on.
On lines 7, and 8 we can determine the column (X) and row (Y) indices in the 2D array that we will be operating on for this kernel. The 1-D index into the memory buffers passed to the kernel is computed on line 10.
On line 11, to prevent accidental array-out-of-bounds reading and writing, we have to make sure that don’t use an array index that exceeds the size of our buffers. The reason why we need to check for array-out-of-bounds indices will be explained when I show the CPU (host) code where the kernel is invoked.
On line 13, the contents of the source matrix are copied to the contents of the destination matrix.
Now let’s take a look at the CPU (host) code for our CUDA enabled application.
The Host Code
The CUDA compiler is also capable of compiling standard C code. Everything that you would use in a standard C/C++ program can be placed in the host code in a CUDA compiled source file.
Let’s update the empty main method shown previously to contain code that will test our CUDA kernel.
First, we’ll define the basic algorithm that we want to implement:
- Define the size of the matrix we will be working on.
- Allocate buffers in host memory to store the source and destination matrices.
- Initialize values of the host buffers.
- Allocate buffers in device memory to store the source and destination matrices. (These buffers will be used by the kernel.)
- Initialize the device buffers with the contents of the host buffers.
- Determine the block and thread granularity based on our problem domain.
- Invoke the kernel function.
- Copy the results back into host memory.
- Verify the results.
- Free device buffers.
- Free host buffers.
So we know what we need to do, now let’s see how we will do it.
This program uses a few standard headers, so let’s add some header files at the top of our source file.
|
1 2 3 |
#include <iostream> #include <string> #include <cmath> |
These are the standard headers that are required for basic output to the console window and some simple math functions.
In the main method, the first thing we do is define the size of the source and destination matrices that will be used to test our CUDA kernel.
Add the following code to the main method:
|
1 2 3 4 5 6 7 8 |
int main( int argc, char** argv ) { const unsigned int matrixRank = 1025; unsigned int numElements = matrixRank * matrixRank; size_t size = ( numElements ) * sizeof(float); std::cout << "Matrix Size: " << matrixRank << " x " << matrixRank << std::endl; std::cout << "Total elements: " << numElements << std::endl; |
On line 19-21 we determine the size of the matrices and size of the buffers that will be used by our test kernel.
Next, we’ll allocate the space in host memory to store the contents of our matrices.
|
1 2 3 4 |
std::cout << "Allocating [host] buffers for source and destination matices..." << std::endl; // Allocate host memory to store matrices. float* matrixSrcHost = new float[numElements]; float* matrixDstHost = new float[numElements]; |
And initialize the values of our buffers to something testable.
|
1 2 3 4 5 6 |
std::cout << "Initializing [host] buffers for source and destination matrices..." << std::endl; for ( unsigned int i = 0; i < numElements; ++i ) { matrixSrcHost[i] = static_cast<float>(i); // Source matrix initialized to i; matrixDstHost[i] = 0.0f; // Destination matrix initialized to 0.0; } |
We also need to allocate some memory on the GPU (device). The CUDA runtime API provides functions similar to the C malloc function for allocating memory directly on the device. The CUDA function for allocating device memory is cudaMalloc and for copying memory from one buffer (host or device) is cudaMemcpy. First, let’s allocate the buffers in device memory.
|
1 2 3 4 5 |
std::cout << "Allocating [device] buffers for source and destination matrices..." << std::endl; float* matrixSrcDevice; float* matrixDstDevice; cudaMalloc( &matrixSrcDevice, size ); cudaMalloc( &matrixDstDevice, size ); |
And then we’ll initialize the device buffers with the contents of the host buffers.
|
1 2 3 |
std::cout << "Initialize [device] buffers using [host] buffers..." << std::endl; cudaMemcpy( matrixSrcDevice, matrixSrcHost, size, cudaMemcpyHostToDevice ); cudaMemcpy( matrixDstDevice, matrixDstHost, size, cudaMemcpyHostToDevice ); |
The cudaMemcpy function can be used to copy memory between the host and device buffers (this method can also be used to copy host host and device device memory buffers as well). The enumeration value specified as the 4th parameter determines the kind of buffers that are used to copy from and store to.
The next step is to determine the granularity of the blocks in the grid, as well as the granularity of the threads in each block. The specifics of grids, blocks, and threads will be discussed in another article about the CUDA execution model. We need to define a grid of thread blocks that is large enough to operate on the entire domain (matrix elements) without exceeding the maximum number of threads per block. Without adding complicated device query instructions, I make the assumption that the maximum number of threads per block is 512, but I limit the size of the thread block to 16×16 (256 threads per block).
|
1 2 3 4 5 6 7 8 9 |
// Maximum number of threads per block dimension (assuming a 2D thread block with max 512 threads per block). unsigned int maxThreadsPerBlockDim = min( matrixRank, 16 ); std::cout << "Determine block and thread granularity for CUDA kernel..." << std::endl; size_t blocks = ceilf( matrixRank / (float)maxThreadsPerBlockDim ); dim3 blockDim( blocks, blocks, 1 ); size_t threads = ceilf( matrixRank / (float)blocks ); dim3 threadDim( threads, threads, 1 ); |
As we’ve seen previously, the matrixRank variable stores size of our 2D matrix in 1 dimension. We want to limit the number of threads per block (dimension) to the size of our matrix, or 16 – whichever is smaller.
On line 54, we compute the minimum number of blocks that are required to process the matrices depending on the maximum number of threads in a block. If our matrix is less than or equal to 16×16, then we will only need 1 block to process the matrices.
On line 56, we compute the number of threads that each block will need to perform the kernel. This number will never be greater than 16 (per dimension) and if the matrix is less than 16×16, then this value will be equal to the size of the matrix determined by the matrixRank variable. The dim3 type is simply a struct that can store 3 unsigned integer components in the x, y, and z member variables.
Now that we have the device memory allocated and initialized and we have determined a safe granularity for our thread blocks, we are ready to actually invoke the CUDA kernel.
|
1 2 |
std::cout << "Invoke the kernel with block( " << blockDim.x << ", " << blockDim.y << ", 1 ), thread( " << threadDim.x << ", " << threadDim.y << ", 1 )." << std::endl; MatrixCopy<<< blockDim, threadDim >>>( matrixDstDevice, matrixSrcDevice, matrixRank ); |
The kernel is invoked on line 60 by first specifying the name of the kernel function to invoke (the kernel function must have the __global__ attribute) followed by the execution configuration.
When using the CUDA runtime API the execution configuration is specified with an expression of the form <<< Dg, Db, Ns, S >>>. The execution configuration expression must appear after the kernel function name but before the function parameters.
- Dg is of type dim3 and specifies the dimension and size of the grid of blocks. For devices with compute capability less than 2.0, the maximum dimensions for the grid of blocks is 2 and the z-component must be set to 1. The maximum number of blocks per x, y, or z dimension is 65,535. So for devices with compute capability 1.x, we can specify a grid size of (65535, 65535, 1) for a total of 4,294,836,225 blocks in a grid.
- Db is of type dim3 and specifies the dimension and size of each thread block. The number of threads per block is computed as Db.x * Db.y * Db.z and cannot exceed 512 for devices with compute capability less than 2.0 and 1024 for devices with compute capability 2.0.
- Ns is of type size_t and specifies the number of bytes in shared memory that is dynamically allocated per block. Ns is optional and defaults to 0.
- S is of type cudaStream_t and specifies the associated stream. S is an optional argument and defaults to 0.
Before we can verify the result, we need to copy the resulting device buffers back to the host buffers. For that, we will use the cudaMemcpy function again, but this time we will specify the cudaMemcpyDeviceToHost enumeration as the copy operation.
|
1 2 3 |
std::cout << "Copy resulting [device] buffers to [host] buffers..." << std::endl; cudaMemcpy( matrixSrcHost, matrixSrcDevice, size, cudaMemcpyDeviceToHost ); cudaMemcpy( matrixDstHost, matrixDstDevice, size, cudaMemcpyDeviceToHost ); |
And now we can verify the result. To do this, we will just check that both the source and destination matrices contain the same data (since our kernel simply copied the data from the source buffer to the destination buffer).
|
1 2 3 4 5 6 7 8 9 10 11 |
std::cout << "Verifying the result (source and destination matrices should now be the same)." << std::endl; bool copyVerified = true; for ( unsigned int i = 0; i < numElements; ++i ) { if ( matrixDstHost[i] != matrixSrcHost[i] ) { copyVerified = false; std::cerr << "Matrix destination differs from source:" << std::endl; std::cerr << "\tDst[" << i << "]: " << matrixDstHost[i] << " != " << "Dst[" << i << "]: " << matrixSrcHost[i] << std::endl; } } |
And finally, we always want to make sure we don’t leave any resources laying around. Let’s make sure we free our resources.
|
1 2 3 4 5 6 7 |
std::cout << "Free [device] buffers..." << std::endl; cudaFree( matrixSrcDevice ); cudaFree( matrixDstDevice ); std::cout << "Free [host] buffers..." << std::endl; delete [] matrixSrcHost; delete [] matrixDstHost; |
An now you should be able to compile and run your CUDA enabled application. If there were no issues, then there shouldn’t be any discrepancies between the source and destination matrices and no errors should be displayed on the console window.
Running this example should give the following results:
|
1 2 3 4 5 6 7 8 9 10 11 12 13 14 |
Matrix Size: 1025 x 1025 Total elements: 1050625 Allocating [host] buffers for source and destination matrices... Initializing [host] buffers for source and destination matrices... Allocating [device] buffers for source and destination matrices... Initialize [device] buffers using [host] buffers... Determine block and thread granularity for CUDA kernel... Invoke the kernel with block( 65, 65, 1 ), thread( 16, 16, 1 ). Copy resulting [device] buffers to [host] buffers... Verifying the result (source and destination matrices should now be the same). Result of MatrixCopy kernel PASSED. Free [device] buffers... Free [host] buffers... Press any key to continue . . . |
You’ll notice from the output that the grid is initialized with 65×65 blocks with each block consisting of 16×16 threads. This particular setup will handle matrices of size 1040×1040, but our actual matrix is only 1025×1025. This is an unfortunate side-effect of choosing this matrix size and I did this on purpose to demonstrate that a grid may consist of more threads than necessary. For this reason, we need to check that the indices of the thread in the kernel does not exceed the elements in our buffers. A better solution to this situation would be to limit the size of our domain (in this case the rank of the matrices) so it fits nicely in the grid of thread blocks. I will discuss this issue in more detail in a later article on performance considerations.
CUDA Exercise
As an exercise to practice writing more complex CUDA applications, try to port the following serial code (implemented on the CPU) into a CUDA kernel.
|
1 2 3 4 5 6 7 8 9 10 11 12 13 14 15 16 17 18 |
void MatrixMultiplication( float* C, const float* A, const float* B, unsigned int rank ) { for ( unsigned int i = 0; i < rank; ++i ) { for ( unsigned int j = 0; j < rank; ++j ) { float sum = 0; for ( unsigned int k = 0; k < rank; ++k ) { float a = A[i * rank + k]; float b = B[k * rank + j]; sum += a * b; } C[i * rank + j] = sum; } } } |
You can assume that A, B, and C are square matrices of size rank * rank.
Also write the host code that is used to invoke the kernel on various sized matrices.
Add a timer that can be used to compare the execution time of the serial code (shown here) and the CUDA kernel. A simple high resolution timer implementation is explained here: http://www.songho.ca/misc/timer/timer.html.
Tips and Tricks
In this section I will describe a few tips that are good to know when programming CUDA enabled applications.
Enabling IntelliSense with CUDA
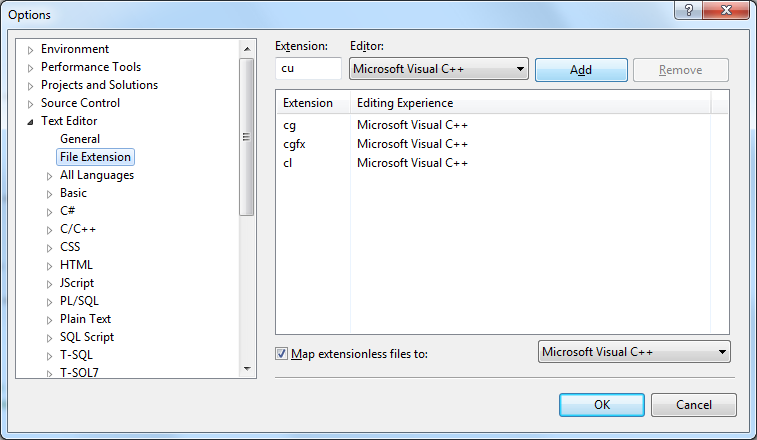
You can tell Visual Studio that you want it to treat files with the extension “.cu” as regular C++ files. This will enable syntax highlighting in the CUDA source files.
- In Visual Studio, open the Options dialog by selecting “Tools -> Options…” from the main menu.
- In the left pane, navigate to “Text Editor \ File Extensions”.
- In the “Extension:” field type “cu” and set the “Editor:” drop-down box to “Microsoft Visual C++”.
- Click the “Add” to add it to the list of known extensions.
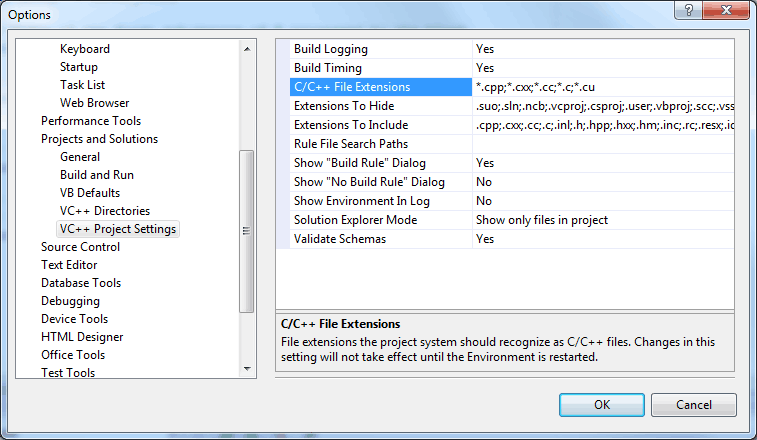
- Next, in the left pane, navigate to “Projects and Solutions \ VC++ Project Settings”.
- In the right pane, select the option “C/C++ File Extensions” and add the “*.cu” extension to the list as shown in the image below. (Don’t forget to separate the extensions with the semi-colon “;” character). NOTE: This option is called “Extensions To Include” in Visual Studio 2010.
- Click the “OK” button to close the Options dialog.
- If you installed the NVIDIA GPU Computing SDK as described in the previous steps, then you can copy the contents of the “usertype.dat” file located in the “%NVSDKCOMPUTE_ROOT%\C\doc\syntax_highlighting\visual_studio_8” directory into the file of the same name located in the “Microsoft Visual Studio 9.0\Common7\IDE” folder. If the file does not exist yet, you can just copy the “usertype.dat” file from the GPU Computing SDK folder to the “Microsoft Visual Studio 9.0\Common7\IDE” folder directly. This file defines the keywords that will be syntax highlighted in the Visual Studio source code editor.
If you are using Visual Studio 2010, you want to change the folder location to “Microsoft Visual Studio 10.0\Common7\IDE”.
This change will not effect syntax highlighting on .cu source files until you restart the Visual Studio IDE.
- Close the Visual Studio IDE.
- Open the Windows Register editor (run the regedit utility).
- Navigate to the registry key:
Widows 32-bit:
[HKEY_LOCAL_MACHINE\SOFTWARE\Microsoft\VisualStudio\9.0\Languages\File Extensions\.cpp] Windows 64-bit:
[HKEY_LOCAL_MACHINE\SOFTWARE\Wow6432Node\Microsoft\VisualStudio\9.0\Languages\File Extensions\.cpp] - Duplicate the default value in the .cpp key into a new key (if it isn’t already there) called .cu (at the same level as the .cpp key).
- Optionally, you can duplicate the .cpp key again into a .cuh key to enable syntax highlighting on CUDA header files.
- Navigate to the registry key:
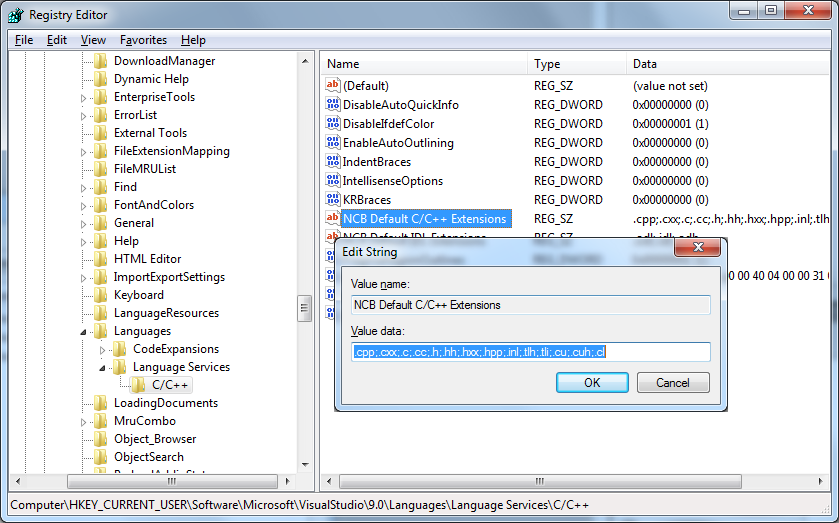
[HKEY_CURRENT_USER\Software\Microsoft\VisualStudio\9.0\Languages\Language Services\C/C++] - Edit the data of the of the “NCB Default C/C++ Extensions” value by double-clicking on it.
- Add the file extensions to the data “;.cu;.cuh;.cl”.
NOTE: If you are using Visual Studio 2010, change the 9.0 to 10.0 in the registry key paths shown above.
If you launch the Visual Studio IDE now, you should have Syntax Highlighting and IntelliSense on files with the .cu extension.
Enabling Visual Assist X with CUDA
If you are using Visual Assist X (recommended) then you can follow the additional steps to enable Visual Assist X to recognize the CUDA source files as source code files and to enable advanced code-completion functionality.
- Open the regedit utility again and navigate to the registry key:
[HKEY_CURRENT_USER\Software\Whole Tomato\Visual Assist X\VANet9] - Edit the “ExtHeader” value to include the header files you want to add. For example “.cuh;.clh;” to include CUDA and OpenCL header files.
- Edit the “ExtSource” value to include the source files you want to add. For example “.cu;.cl;” to include CUDA and OpenCL source files.
- Close the RegEdit utility.
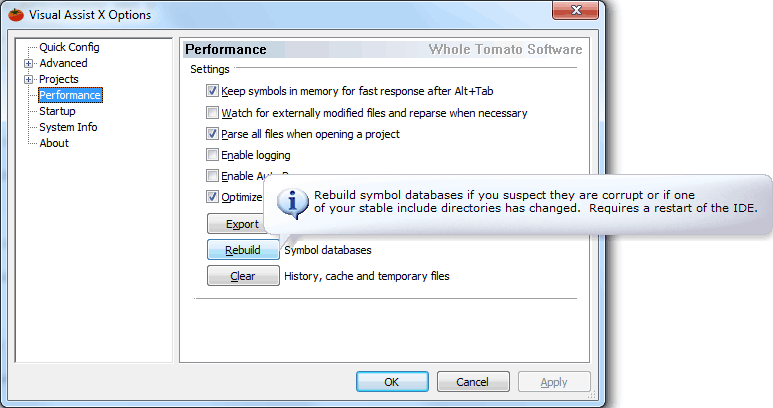
- Open the “Visual Assist X Options” dialog box in the Visual Studio IDE and select the “Performance” options.
- Click the “Rebuild” button to rebuild the symbol database.
- Resart the Visual Studio IDE to allow Visual Assist X to rebuild the symbol database. The next time this happens, Visual Assist X will also parse the .cu source files as C++ files.
NOTE: If you are using Visual Studio 2010, change VANet9 to VANet10 in the registry key shown above.
Combining C++ in Host and CUDA Source Files
If you have already tried to combine .cpp files and .cu file in the same project using the CUDA Runtime API custom build configuration and either of them are using C++ specific headers like <iostream> and/or <string> (which is very common if you prefer to use the std::cout instead of printf) then you may have noticed that by default, these two source files don’t link together very well. You may get something similar to the output shown below:
|
1 2 3 4 5 6 7 8 9 10 11 12 13 |
1>LIBCMT.lib(_sqrt_.obj) : error LNK2005: __CIsqrt already defined in MSVCRT.lib(MSVCR90.dll) 1>LIBCMT.lib(_fpinit_.obj) : error LNK2005: __fltused already defined in MSVCRT.lib(dllsupp.obj) 1>LIBCMT.lib(_fpinit_.obj) : error LNK2005: __ldused already defined in MSVCRT.lib(dllsupp.obj) 1>LIBCMT.lib(tidtable.obj) : error LNK2005: __encode_pointer already defined in MSVCRT.lib(MSVCR90.dll) 1>LIBCMT.lib(tidtable.obj) : error LNK2005: __decode_pointer already defined in MSVCRT.lib(MSVCR90.dll) 1>LIBCMT.lib(invarg.obj) : error LNK2005: __invoke_watson already defined in MSVCRT.lib(MSVCR90.dll) 1>LIBCMT.lib(crt0dat.obj) : error LNK2005: __amsg_exit already defined in MSVCRT.lib(MSVCR90.dll) 1>LIBCMT.lib(crt0dat.obj) : error LNK2005: __initterm_e already defined in MSVCRT.lib(MSVCR90.dll) 1>LIBCMT.lib(crt0dat.obj) : error LNK2005: _exit already defined in MSVCRT.lib(MSVCR90.dll) 1>LIBCMT.lib(crt0dat.obj) : error LNK2005: __exit already defined in MSVCRT.lib(MSVCR90.dll) 1>LIBCMT.lib(crt0dat.obj) : error LNK2005: __cexit already defined in MSVCRT.lib(MSVCR90.dll) 1>LIBCMT.lib(mlock.obj) : error LNK2005: __unlock already defined in MSVCRT.lib(MSVCR90.dll) 1>LIBCMT.lib(mlock.obj) : error LNK2005: __lock already defined in MSVCRT.lib(MSVCR90.dll) |
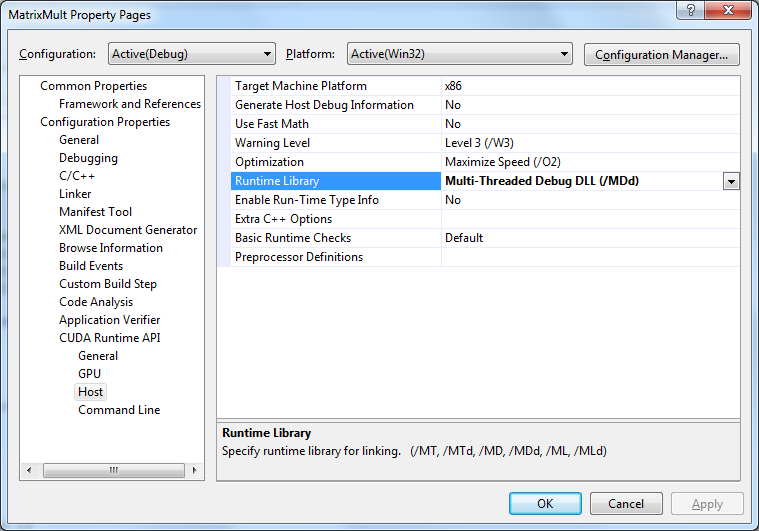
To resolve this, you must specify that both the “.cpp” host source code files and the “.cu” CUDA compiled source files are using the same Runtime Library.
- Open the Project Property Pages dialog box.
- Navigate to the “Configuration Properties \ C/C++ \ Code Generation” configuration options and check the “Runtime Library” setting.
This is the runtime library that will be used to link the .cpp source files that are compiled with the standard C/C++ build tool-chain. - Next, navigate to the “Configuration Properties \ CUDA Runtime API \ Host” configuration options and make sure that the “Runtime Library” property is set to the same value as in the previous property setting.
This setting determines the Runtime Library that will be used to link the host code portions of the .cu source files that are compiled with the CUDA Runtime API build tool-chain. - Do this for both the Debug and Release configurations to ensure both configurations build without errors.
Conclusion
In this article, I have showed you how to get started with CUDA from installing the CUDA toolkit to setting up your own CUDA capable projects in Microsoft Visual Studio.
I also showed a very simple CUDA application that demonstrates how to invoke a kernel on the GPU.
After reading this article, I hope you are ready to get started building your own highly parallelized CUDA applications or in the least have a slightly better understanding what CUDA is and how you can use it.
References
 Kirk, David B. and Hwu, Wen-mei W. (2010). Programming Massively Parallel Processors. 1st. ed. Burlington, MA 01803, USA: Morgan Kaufmann Publishers. |
| NVIDIA Corporation (2011, May). NVIDIA CUDA C Programming Guide. (Version 4.0). Santa Clara, CA 95050, USA Available from: http://developer.download.nvidia.com/compute/cuda/4_0/toolkit/docs/CUDA_C_Programming_Guide.pdf. Accessed: 15 November 2011. |



Just a quick note that if you do:
“Add a timer that can be used to compare the execution time of the serial code (shown here) and the CUDA kernel. A simple high resolution timer implementation is explained here: http://www.songho.ca/misc/timer/timer.html.”
The WIN32 #define in the timer source-code will not work if the Timer class is created or used in the .cu file. You can either add the WIN32 pre-define to the “Project Properties->CUDA C/C++->Host->Preprocessor Definitions” or, more preferably, change the WIN32 #define to the more commonly accepted _WIN32 #define throughout the Timer source-code.
Or you can just not use this Timer and go for your CUDA Timer http://3dgep.com/?p=2081#CUDA_GPU_Timers 🙂
Another option is to only provide an abstract interface to the timer class that does not declare it’s private members in the interface (according to C++ abstractions). Only the implementation (which can quickly be implemented using the PIMPL idiom) needs to provide different implementations and therefor you eliminate the need to separate class member variables based on the platform (using the elusive WIN32 macro) inside the header file.
Alternatively, you can also use the std::chrono::high_resolution_clock provided by the C++11 standard. If you don’t have a C++11 compliant compiler, then you can use the Boost Chrono library for a platform-independent high-resolution timer.
First of all, I would like to thank you for the great resource, probably the most comprehensive and self-contained article (quick, at the same time) that CUDA newbies could ever find to get started, with confident steps one at a time… Other articles on the blog are also great, keep up the great work!
I would like to add something to where you mentioned how to setup the CUDA runtime library to resolve the linker error. I received another error when tried to compile it with x64 platform: “fatal error LNK1112: module machine type ‘X86’ conflicts with target machine type ‘x64′”. Most web resources give the following solution: “Properties > Configuration Properties > Linker > Advanced > Target Machine. Select MachineX64 if you are targeting a 64 bit build, or MachineX86 if you are making a 32 bit build.” It was not enough to get rid of the error, and after hours of searching I finally found the following solution from another resource: “Properties > CUDA Runtime API > Host > Target Machine Platform. Select x64 if you are targeting a 64 bit build, or x86 if you are making a 32 bit build.” This one worked. I hope this will save somebody some time! -Cheers
Morad,
Thanks for the tip! This is usually not a problem if you stick to 32-bit builds which is what I recommend my students to do. This also prevents issues when trying to link against other 3rd party libraries that only distribute the 32-bit binaries for their API.
But it is good to keep in mind that if you decide to target 64-bit platforms that you update the CUDA project settings to match the projects C/C++ settings to match.
I will update the article according to this information.
I just want to clarify that in VS2010 this setting is found in Project Properties > Configuration Properties > CUDA C/C++ > Common > Target Machine Platforrm.
Thank you Jeremiah. I appreciate your prompt response.
Hi, I do everything as you said, my program could build success,but it cann’t run .when I run it ,it just return that “computer miss the cudart32_42_9.dll “,Then I looking for the dll ,I can find it in the folder of “C:\Program Files\NVIDIA GPU Computing Toolkit\CUDA\v4.2\bin” ,what’s the problem? please help !!
This common problem occurs because the runtime cannot resolve the location of the DLL.
The dynamic loader will search for DLLs first in the current working directory of the process (this is usually the same directory as the exe file). If the DLL is not found there, then the loader will search the system directories. You can add search paths for DLLs by adding the directory (in this case “…CUDA\v4.2\bin”) to your system’s PATH environment variable.
The easiest (and most portable) solution to this problem is to copy the missing DLL into the folder where your EXE is compiled.
Hope this helps.
Nice article. Thank you.
A question.
Is CUDA programming something like making use of a compute shader pipeline?
MontCliff,
Yes, CUDA is a programming language (similar to C) that is run directly on the GPU’s compute units.
Thanks for your interest in this article! I know it needs a refresh!