In this part, we will build on the code from our work with Tiles. We aim to place this in a more reusable and understandable structure – this is where classes come in.
Previous Part: TilesNext Part: Data Structures
Getting Started
For this tutorial, we’ll be using the same template from the 2nd tutorial:
In case you need a starting point, here is some code that will do for today:
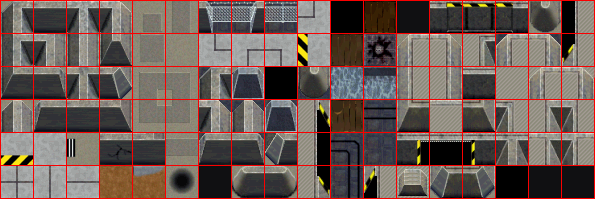
If you didn’t download the nc2tiles.png image file from the previous tutorial, then don’t forget to download the image below and save it in the assets folder where you extracted TheTemplate.zip file.
Open the game.cpp file and replace the contents of the file with the following source code:
|
1 2 3 4 5 6 7 8 9 10 11 12 13 14 15 16 17 18 19 20 21 22 23 24 25 26 27 28 29 30 31 32 33 34 35 36 37 38 39 40 41 42 43 44 45 |
#include "game.h" #include "surface.h" #include "windows.h" namespace Tmpl8 { Surface tiles("assets/nc2tiles.png"); Sprite tank(new Surface("assets/ctankbase.tga"), 16); int px = 0, py = 0; void Game::Init() {} void Game::Shutdown() {} char map[5][30] = { "kc kc kc kc kc kc kc kc kc kc", "kc fb fb fb kc kc kc kc kc kc", "kc fb fb fb fb fb kc kc kc kc", "kc lc lc fb fb fb kc kc kc kc", "kc kc kc lc lc lc kc kc kc kc" }; void DrawTile(int tx, int ty, Surface* screen, int x, int y) { Pixel* src = tiles.GetBuffer() + 1 + tx * 33 + (1 + ty * 33) * 595; Pixel* dst = screen->GetBuffer() + x + y * 800; for (int i = 0; i < 32; i++, src += 595, dst += 800) for (int j = 0; j < 32; j++) dst[j] = src[j]; } void Game::Tick(float deltaTime) { screen->Clear(0); for (int y = 0; y < 5; y++) for (int x = 0; x < 10; x++) { int tx = map[y][x * 3] - 'a', ty = map[y][x * 3 + 1] - 'a'; DrawTile(tx, ty, screen, x * 32, y * 32); } if (GetAsyncKeyState(VK_LEFT)) { px--; tank.SetFrame(12); } if (GetAsyncKeyState(VK_RIGHT)) { px++; tank.SetFrame(4); } if (GetAsyncKeyState(VK_UP)) { py--; tank.SetFrame(0); } if (GetAsyncKeyState(VK_DOWN)) { py++; tank.SetFrame(8); } tank.Draw(screen, px, py); } }; |
There are some problems with this code, and we’ll fix these problems using classes, which allow us to encapsulate functionality.
Objects
Your game world consists of objects. Take the last episode for example: we have a player tank, a backdrop (which consists of tiles), a screen that we draw to. Later on, we might want to add bullets, enemies (enemy), more levels and so on. This is a list of things, not a list of operations.
You could actually argue that the most logical way to start thinking about what a game will do is actually: what objects do I need? And, slightly more detailed: what do these objects do? What properties do these objects have? And what is the relationship between objects?
Note that this is something you have already been using. Consider the default code in the Game::Tick method:
|
30 31 32 33 34 35 |
void Game::Tick( float deltaTime ) { // clear the graphics window screen->Clear( 0 ); ... } |
When you open up game.h you will see that your game has a screen variable, which is an object. The type of this object is Surface. In the default template code we are telling this surface to do things: it’s asked to clear itself, and to print something. A Surface can do more: you can find out what by looking at surface.h, line 37. There you will see that a Surface can also Resize itself, amongst other things. A Surface also has some properties: width, height, Pixel buffer, and some other things. The things that the Surface can do are called methods. The properties of an object are called member variables, or just properties.
Tank Object
Let’s apply this in a more interesting way. In the previous tutorial, you added a player-controlled tank, with collision detection, to a tile-based backdrop. In this tutorial, we’ll make the tank move by itself, using three simple rules:
Tank Rules
- If the tank can move to the right, it will
- If the tank cannot move the the right, it will:
- Move up, if it is in the lower half of the screen;
- Move down, if it is in the top half of the screen.
- When the tank reaches the right side of the screen, it is respawned at the left side.
The main object that we will be working on is a Tank:
|
11 12 13 14 15 |
class Tank { public: }; |
Put this code in game.cpp, right above the Game::Init() method. Once you have that in place, you can create your tank:
|
16 |
Tank mytank; |
So now you can make variables of type Tank. The object does not yet have any properties though, and it can’t do anything yet… Our particular tank will need to perform one task: Move. We want to draw it once every time the Game::Tick method is executed, so when it moves, it should do one step.
In terms of properties for our tank, there are a few obvious ones: position (x and y), and orientation (rotation). Considering this, the tank class now becomes:
|
11 12 13 14 15 16 |
class Tank { public: void Move(); int x, y, rotation; }; |
When we first create a tank, we need to set its x and y and rotation properties. Until now, you would have done this in the Game::Init() function, but now there is a better way. It is called a constructor, and it looks like this:
|
11 12 13 14 15 16 17 18 19 20 21 22 |
class Tank { public: Tank() { x = 0; y = 4 * 64; rotation = 0; } void Move(); int x, y, rotation; }; |
A constructor has the same name as the class and it has no return value. A constructor can take arguments in which case it is called a parameterized constructor. In this case, the constructor doesn’t take any arguments and in this case it’s called a default constructor.
The good thing is that when you create your tank (by creating a variable of type Tank), the constructor is executed. So, basically the constructor is the Init method of your class. And, best of all, each class can have its own, and it’s executed automatically for you.
Tank Behavior
Now that we have a Tank variable (called mytank), we can use it. First of all, we can access its properties: mytank.x, mytank.y and mytank.rotation. We can also make it do something. Add the following line to your Game::Tick function:
|
58 |
mytank.Move(); |
When you compile the program, you will get a linker error (LNK2019). We told C++ that there exists a Tank object, and that it can be moved using the Move method, but we didn’t specify what happens when the Move method is called. Let’s fix that. In the Tank class, replace void Move(); by:
|
20 21 22 23 24 25 |
void Tank::Move() { x++; if (x > 800) x = 0; tank.Draw( screen, x, y ); } |
Note that this does not implement all the rules specified earlier, we’ll save that for the assignment. 🙂
When you try to compile this code, you will get another error. This time, a compiler error (C2065). The above code assumes that screen member variable can be used in the Tank class, but apparently it cannot… There is a reason for that: screen belongs to another object, which is called Game, and we can’t just access it. Even though this is annoying right now, this is actually good: member variables belong to their own object. This allows us to use x and y in a Tank class, and x and y in a Bullet class as well: the Tank‘s x and y variables will be referred to (in our program) as mytank.x and mytank.y; x for a Bullet might be mightybullet.x. And, if there are multiple bullets, they all have their own x and y variables: bullet1.x, bullet2.x, and so on.
Where and how a variable can be accessed is referred to as the scope of the variable. Refer to Scope for more information about scope in a C++ program.
That doesn’t solve the screen problem, obviously. Luckily, the solution is not hard. The game does know about screen, and the game moves the tank. So, the game should tell the tank about the Surface as well. Like this:
|
63 |
mytank.Move( screen ); |
And, the tank should listen to that. Update the Tank‘s Move method to this:
|
20 21 22 23 24 25 |
void Tank::Move( Surface* gameScreen ) { x++; if (x > 800) x = 0; tank.Draw( gameScreen, x, y ); } |
Note that it’s not called screen anymore, because it is a different variable now: it’s a function argument. This time, all is well, and the tank does its limited behaviour, which you get to fix in the assignment.
Conclusion
A few final words before you start hacking away: You have been using classes without knowing it. There is a Game class, a Surface class, and a Sprite class. And the template has a few more objects, which you didn’t use yet.
Having a class means nothing by the way; you merely tell C++ what something looks like. To actually create something, you create a variable of that type, such as mytank. This variable is called an instance. Each instance has its own set of member variables, as defined in the class definition.
You use classes for many reasons:
- It allows you to think in high-level concepts before you get to the details;
- It groups data on a per-object basis rather than in one big messy pool;
- It groups data and the code that operates on that data.
We will dive deeper in the subject at a later time. For now, you know enough for the…
Assignment
There are three challenge levels for this assignment. You are encouraged to tackle the basic task first. When you are up for a greater challenge, you can move on to the intermediate and hard challenges.
Basic:
- Using what you learned from Part 11, correctly implement the three rules for the tank object described above, using the collision code and full-screen map from episode 11.
- Using what you learned from Part 10, make an array of tanks. Each tank starts at a random tile, and executes the same rules.
Intermediate:
- Expand task 2 so that no two tanks start at the same tile.
- Move the tank class to its own set of files: a
tank.hfor the class definition, and atank.cppfor the implementation of the functions.
Hard:
- Expand task 3 so that no two tanks occupy the same tile while walking the scene. In other words: tanks should detect each other and not be allowed to intersect.
- Make a class for the tile map rendering code so that you can separate its data (tiles, width, height, …) and functionality (draw, collisions, …) from the game code. Doing this will allow you to easily reuse the tile map code in another project.
Previous Part: TitlesNext Part: Data Structures


 TheTemplate.zip